A basic overview of sprint training and technique, including the sprint start.
By Liam Coultman, The Speed Project
Elements addressed in this article include, accelerative sprinting, maximum velocity sprinting, the break-down of a sprint across 100m, ground contact time, movement mechanics, reactive forces, and perfecting the sprint start.
The genetic makeup of an athlete may bless him or her with natural speed, but without working on proper sprinting mechanics an athlete will never reach full potential. This means speed can be taught and all athletes have the potential to increase their speed.
Mastering proper sprint technique not only allows for an athlete to run faster but also reduces the risk of injury caused by poor mechanics. You could spend weeks working on top speed without seeing any improvement, whilst focused and attentive time spent on sprint form could potentially increase your speed within a few hours.
For the sake of this article we will focus on horizontal sprinting across 100m. Obviously for other sprint events and team games there will be more detailed and more event/sport specific technical elements (bend running, multi-directional, stop-start movement etc.) but this article will provide a good basis of information that can be applied to some extent across all forms of sprinting.
Elements Of A 100m Sprint
There are many technical cues involved with sprinting, but as an athlete or coach, you should focus on mastering a few things rather than trying to work on everything at once. Information overload can become a real issue, especially for beginners. Many times I’ve seen athletes run in a robot-like fashion, whilst overthinking and trying to sprint “perfectly”, which is ultimately detrimental to performance.
Breaking a sprint into “elements”, then working on aspects within each can help athletes with their learning process. Some coaches do not like to separate phases of a race and prefer to focus on it as a whole, however I think most (myself included) like to break a sprint down into different components because it provides available cues that an athlete can easily understand.
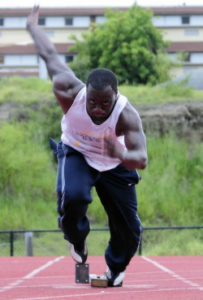
- Element 1: The Acceleration Phase
This phase involves blasting out of the blocks by pushing off the rear and front leg hard. Here, you want to pull your rear leg through quickly whilst the body leans forward. Then extend the leg on the front block at the knee and hip upon completion of the drive.
I always tell my sprinters that they should be looking to clear around 3 feet on their first stride out of the blocks with focus on pumping their arms as they drive out.
It’s important that the front foot is driven back onto the ball of the foot for the first stride whilst maintaining a forward lean. I’ve seen athletes land on their heel after their initial stride due to overstriding with a high knee. This will only cause the athlete to decelerate faster and put unnecessary pressure on the hamstrings .
- Element 2: The Transition Phase
After exploding from the blocks you want to increase velocity and make an efficient transition to an upright sprinting action. After you leave the blocks, try and increase your stride length and frequency with each stride as you come into the upright position over the first 20-30m.
- Element 3: The Gliding Phase
This phase begins once the torso is upright. Here you will use your leg strength to maintain a wide but comfortable stride length. At this point you should be completely relaxed, low shoulders, jelly jaw and glide to the finish line.
Acceleration And Maximum Velocity
An athlete begins a sprint by accelerating, then (depending on the distance of the race) will transition into maximum velocity sprinting. Track sprinters will accelerate from a dead start where they are not moving, whereas a games athlete, such as a rugby player, is likely to already be in motion. We’ll continue to focus on these aspects from a 100m viewpoint and horizontal sprinting.
During the 100m an athlete will begin the race by accelerating until he reaches (or comes very close to) maximal sprinting velocity. At this stage it is no longer possible for the athlete to continue accelerating. The focus switches to trying to maintain maximum velocity through sound technique, which will help limit the rate at which deceleration occurs during the remainder of the race.
Deceleration cannot be avoided, however the degree at which an athlete decelerates will ultimately have an impact on one’s overall sprinting performance. The most elite sprinters can hold their maximum velocity longer as they have a reduced amount of fatigue affecting their central nervous system and typically decelerate around the last 20m of the 100m.

Ground contact during accelerative sprinting
For faster sprint times it is important to limit the amount of time that your foot spends in contact with the ground during each stride. This is why sprinters run on the balls of their feet and sprinting spikes all have the spikes positioned on the forefoot.
Force production is another important aspect to generate speed when making contact with the ground. The greater the force you apply into the ground, the greater return of impulse production, which creates greater speed. Longer foot-to-ground contact times will allow for greater force generation and impulse production.
So an athlete should limit ground contact times but also have long ground contact times to generate a greater force? This is obviously contradictory information. The goal is to cover the required distance in the shortest time possible. Therefore, although a longer contact time allows for a greater force, it is not favorable to create it by this means. Yes, you will have more powerful strides, but ultimately it will slow you down. Therefore the key is to apply the optimal amount of force possible into the ground during the limited amount of time that contact is made.
Another thing to consider when accelerating is the point of foot-to-ground contact in relation to the athlete’s center of mass. You want the point of contact to be behind your center of mass so that there will be less ground contact time. This is why it’s important to stay low and drive out the blocks, rather than immediately transfer into an upright position. Take care not to overextend your stride as you will not be able to produce as much force during ground contact and will be more susceptible to injury.
Maximum velocity sprinting
During maximum velocity, as with the acceleration phase, shorter contact times are linked with better performance. Again, this can be achieved through applying optimal vertical forces during ground contact. This will lead to increased speed because you will be able to generate a great enough force impulse to overcome gravity and bound off the ground more rapidly.
One question that is always asked is whether an athlete should focus on increasing stride frequency or stride length. Ultimately this will depend on the athlete and their running style. However, top sprinters can increase their stride frequencies during peak sprinting without decreasing stride length if they apply peak vertical forces. This is why it’s so important for coaches and athletes to understand acting forces on the body during the phases of a 100m sprint. This understanding will allow for the improvement and development of each phase without negatively affecting the other.
In the acceleration phase it was beneficial to have the foot behind the center of mass. Bringing the foot back during maximum velocity may only be beneficial to a certain point, after which it will become detrimental to performance and increase deceleration by causing the upper body to lean forward. A good tip is to make sure that when the foot makes contact with the ground, it’s placed under the hip.
The stride cycle

The stride cycle begins at the touchdown phase. At the point of touchdown a sprinter loses momentum and slows down due to the braking effect. This is simply where the foot makes its initial contact with the ground.
This is where the ground contact time that we have been discussing begins and then ends after the toe off phase where force is produced when pushing off the surface. This then leads to the flight phase where neither foot is in contact with the ground, and ends with the second touchdown as the rear leg becomes the lead.
Factors affecting technique
Relaxation
A lot of the time you will see athletes tense their whole body whilst sprinting. This is a red flag in relation to technique. It could be down to nerves but is also likely due to trying too hard to generate force and exert power. This causes unwanted tension in the body and will lead to poor form. By overtensing, the body wastes energy, becomes stiff and is unable to move fluently.
Posture
Good posture is essential for sprinting. Many athletes have a tendency to lean forward by overflexing at the hips. A slight tilt is recommended but leaning too far forward will slow you down and ultimately affect your running mechanics.
A good way to ensure you have good sprinting posture is to make sure that all drills are completed with perfect form (A skip, B skip etc.). Poor form during your drills will transfer into your sprinting technique so its highly important that they are performed correctly. Focus on keeping your back straight, head neutral with your spine (this will keep your head above your shoulders) and look straight ahead.
Simple way to improve your posture and strength
A great exercise that I get my athletes to perform are back extensions. Performing this exercise regularly increases trunk strength and improves physical fitness. Back extensions target your erector spinae which contains parallel sets of muscles that run down the spine from the base of the neck to the sacrum. These muscles control extension and flexion of the vertebral column and can increase optimal posture of the spine when performing sprints.
Back extensions also engage the hamstrings and strengthen other muscles which will allow you to become stronger and keep the torso erect when sprinting.
Arm movement
 Its vital to recognise that your arms play a vital role when sprinting. Your arms help to propel your legs which will lead to you sprinting faster. I heard sprinting legend Carl Lewis once say he uses the cue “elbow to the sky, thumb to the eye” to ensure his athletes are moving their arms correctly. I like this a lot. It’s catchy and easy for my athletes to remember.
As mentioned, for fluidity it is important to stay relaxed. Relaxation in the arms comes from dropped shoulders and no tension in the hand or fist. This will help you achieve a synchronised rhythm with your legs.
Stride length
Be careful when trying to open up your stride when trying to increase the length of ground covered. As mentioned, overstriding means you will generate less power during ground contact which will increase the rate at which you decelerate. It also puts a lot of strain on the hamstring muscles, increasing your risk of injury.
Try to complete every sprint cycle in a circular motion where you are aiming to keep your knees parallel with the ground and your feet flexed upwards towards your shins.
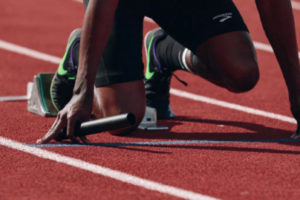
Starts
Perfecting your sprint starts (especially when using blocks) is arguably the most important aspect of the acceleration phase as it will affect your overall efficiency throughout the race. It’s important to practice your starts separately so that you are comfortable using the blocks, moving efficiently and reacting to the gun.
Exercises to Improve Your Sprinting Technique
When it comes to sprint technique there are many drills you can practice which will help you with your form. Here are a couple of exercises you can use that will be beneficial to all athletes who want to improve their speed and technique.
Sled striding
When pushing or pulling a sled you will see that the position you obtain is very similar to when driving out of the blocks. Using a sled is a great way to reinforce this positioning which can help improve your start off the blocks.
Don’t make the mistake of loading the sled with lots of weight. The purpose here is to practice your running stride, not to see how much weight you can shift! Focus on stride length, leaning forward and pushing powerfully off the balls of the feet during each stride.
Don’t push the sled too far. As in the drive phase of a sprint, you should drive the sled forward for about 30-50m. Repeat this for around 10-20 reps depending on your fitness level. You can increase the amount of reps as necessary.
Hill running
Hill running is perfect for improving your acceleration. The incline causes the body to automatically lean forward when sprinting up the hill. To make it up, you will really have to drive the knees up high and you’ll be forced to run on the balls of your feet. Don’t worry too much about how steep the hill is but aim for a 15% incline.
Example: Sprint up the hill, then slowly walk back down and repeat. Do this for a total of 5-10 reps for 2-5 sets. Again this depends on your fitness level. Try not to complete these at a high intensity (above 75%) otherwise you will struggle to complete the workout. Aim for 5-8 minutes rest between sets depending on how many reps you perform.
Sprint form checklist and reminders
Upper body
Head
- Keep your head in line with your spine
- Focus your sight directly down the track
- Relax your neck and jaw muscles
- Don’t clench your teeth
Shoulders
- Don’t shrug your shoulders. They should be kept low, not up by your ears.
Hands and arms
- Run with open palm (if you naturally run with a closed fist, stay relaxed and don’t clench)
- Remember “Elbow to the sky, thumb to the eye”
- Sync arms with legs
- Remain upright during maximum velocity. Flexing or extending at the hip will limit your range of motion
Lower body
- Run on the balls of your feet and push off with your toes
- Keep stride long but comfortable. Overstriding means less power and unnecessary stress on the hamstrings
- Focus on rapid turnover of sprint cycles with knees parallel to the ground
Perfecting Your Sprint Start
We all know that sprint events can be won or lost by the smallest of margins, right? This means that every millisecond counts and is the reason why athletes spend so much time trying to perfect their start technique and reaction time. When it comes to sprint starts, athletes with the best reaction time, greatest power, and ability to accelerate most rapidly, will excel more than simply the strongest athlete. Therefore, an athlete with a great start may be able to win a race even if he or she is not the fastest athlete in the field.
An athlete with a super quick start leaves the blocks first and starts accelerating. The athlete is then able to reach top speed before the other athletes. So although his/her top speed may not be as quick as another competitor, the ability to reach top speed before anyone else could be enough to take him or her across the finish line in the number one position.
So the importance of a great sprint start can’t be stressed enough. Obviously it is not as simple as that, and there are other components of the race that must be accounted for, but a good a start could potentially make all the difference.
I’ve found that a lot of athletes worry about using blocks and do not feel entirely comfortable using them. Questions like “how far away should the blocks be from the starting line” and “which foot should I have in the front pedal” always come up. These are all things that can be addressed during training, so let’s jump straight in and look at how we can go about answering these questions, improving your sprint start and increasing your sprint times.
How To Start
Dominant Leg
You’ll notice that not every sprinter starts with the same foot forward. It is down to the athlete and coach to determine which leg is the dominant leg simply through trial and error. Some athletes go with the leg they feel is stronger or even do some tests with their coach to determine which one is more dominant. If I have an athlete who is unsure, or just starting out, I get him to practice with both and we can assess which position feels most comfortable and allows for a greater acceleration.
This is ultimately what it comes down to; where you feel more comfortable and which position allows you to generate the most power and get out of the blocks quicker. Essentially that’s what your training is for, to see what works well and what doesn’t. You can always make adjustments where needed later on after analysis. One thing I will say, make sure that any adjustments are always made during training. Never try out something new at a competition or meet as you risk breaking your routine and under-performing as a result.
Block Spacing
The dominant leg will be placed on the first pedal (closest to the line) and the second pedal will be placed slightly behind that. I use two feet spaces from the line to determine the position of the first pedal and three feet from the line to determine the second. There is no rule as to the exact spacing of the pedals but I’ve found that this is a good guideline.
Again, it will come down to where you feel most comfortable but bear in mind, if your feet are too far away from the start line, you will struggle to generate any power, and if your feet are too close, you’re likely to stumble onto your face! So if in doubt, use the guidelines i’ve suggested. Use time during training to get this right!
And I suggest you do the same with the pedal angles. If you want a guideline, I use a 45 degree angle for the first pedal and 55 degree for the second but again, play around with it during training to see what best suits you. It’s very important however that once you have your blocks in a good position where you feel comfortable that you take a note of the positioning or remember it exactly. This will allow you to have the same setup every time during training and competition.
This is important as even the slightest changes can lead to variations in your drive phase. It will also give you one less thing to focus on when it comes to race day. Once you get more confident and can determine your strengths and weaknesses, you can tweak during training to make improvements.
Hand Placement
 It’s important that your hands are placed as close to but behind the line. As with the other points, the width of your hands again will be determined by where you feel most comfortable. Some athletes prefer just outside shoulder width, whereas others, who are perhaps more powerful choose to go even wider so they can get their bodies lower to the ground and generate more power. You have to be strong to do this if you don’t want to end up falling flat on your face. I will say however, don’t have your hands too close together…definitely not inside shoulder width. This will make you sit in a very high position and make it more difficult for you to explode from the blocks and your drive phase will suffer due to your angles.
Now that you’re set up, let’s move on.
Reacting To The Gun

It’s important to develop your reaction time to get off to a flying start. You need to make sure that you react ONLY to the gun. You don’t want to have all your hard work in training be for nothing by being kicked out of the race for jumping the gun. It can also be very distracting for the other racers (which is one of the reasons it’s now one strike and out!) so don’t be that guy (or girl), just don’t.
When training, it’s a good idea to have your coach or someone call the command out for you when practicing your sprint starts. You can go by voice alone, or use a tool to imitate the bang. For you coaches (or disciplined athletes) I like to give my athletes a forfeit if they false start during training. This will help discourage this action, which is especially good if you have an athlete with a tendency to false start.
How To Execute
 As mentioned already, it’s vital that you go through the same routine and set up each and every time you use your blocks (unless you are trying out something new during a workout) as you don’t want anything to affect your acceleration through your drive phase. Nerves, the competition, the crowd watching and the possibility of a false start will give you enough to worry about, so your blocks routine should be second nature. These factors are things that should not be focused on, but let’s be honest, we’ve all thought about them at one time or another, and the pressure only increases as the competition gets higher, so it’s important to erase as many limiting factors as possible.
Once your blocks are set up how you want them, make sure that they are securely pressed into the track so that they do not move once you start. Have a few practice starts to test this and go through a routine that allows you to clear your mind and focus solely on the race. I like to picture myself running the perfect race (and winning, obviously) before I get in the blocks.
To get into the sprint start position, crouch down and slowly back yourself into the blocks until your feet are positioned where you want them on the pedals. Get comfortable in the blocks first, as once the announcer says “set” you could end up being disqualified if you move. Begin in the crouched position with your back knee on the ground and resting on the fingertips. During set, take a deep breath in and bring the hips up into a loaded position. Don’t come up too high with the back leg, otherwise you will not be able to generate much power and you will end up in an upright position much sooner and miss out on your speed build-up during the drive phase. DON’T try and anticipate the gun! You could end up being disqualified or missing the actual gun and have an even slower reaction. Wait for the ‘B’ of the bang and launch yourself out of the blocks, pushing off the pedals with both feet and really pumping the arms rapidly.
It’s important that you begin aggressively as failing to do this will reduce your speed during your drive phase of the race. Drive forward for the first 10m then from 10-30m you should gradually begin to come up into an upright position where you should then be nearing full flow and full speed. I should add, the distances of the drive phase can vary depending on how quickly you can accelerate.
The Speed Project aims to supply practical information to athletes and coaches who want to improve their speed and agility for enhanced performance. The site provides access to informational articles, resources, blog posts, and interviews with world-class athletes. The creator, Liam Coultman, is a sprint and conditioning coach, and certified PICP Athlete Performance Specialist. He’s currently located at the National Performance Centre for Athletes in Spain. If you have any questions for Liam you can contact him by email: liam@thespeedproject.com. Check out The Speed Project website: www.thespeedproject.com and follow The Speed Project on social media: Facebook: @officialspeedproject / Instagram: @officialspeedproject
