Track Coach editor Russ Ebbets provides a comprehensive account of “pre-hab” in track & field, injury prevention for each body joint complex.
By Russ Ebbets
Sports injuries can fall into two categories. Some are caused by trauma. One can use football, boxing or ice hockey as examples. Forces are introduced to the body that cause different types of damage ranging from bruises to broken bones. This fact is complicated by one being thrown or knocked forcefully to the ground. A second set of injuries stems from repetitive actions due to misuse or overuse. These are forces that are repeated hundreds or thousands of times and cause wear and tear on the body. The body can neither accommodate or recover from these micro-traumas without treatment. Track & field athletes traditionally suffer from repetitive-type injuries.
For many coaches and athletes injuries are a foregone conclusion. They see it as one of the “costs” of athletic participation. On a certain level this can be rationalized, especially for the elite athlete who is constantly pushing the point, constantly making the body do things it has never done before. F. Scott Fitzgerald once commented “brave men (and women) play close to the line.”
But what if this perception of injuries as a “given” is wrong? What if injuries are due to a lack of preparation, lack of forethought or faulty planning, all translating to something preventable. It’s an interesting idea.
What this article will discuss are strategies and tactics that work to prevent injuries. Six biomechanical concepts will be presented that will serve as foundational concepts. An understanding and appreciation for these concepts will allow one to better understand the injury prevention recommendations that follow as we progress through the body joint complex by joint complex.
MOVEMENT BIOMECHANICS
The human body can only assume one of six positions at any given time. The six boxes will be discussed as if one is in the standing position (Figure 1). Box A is a neutral posture, standing in a relaxed upright position. Box B is compression. Compression happens when joints are forced together. This would happen if one were to stand on a chair and jump down. As the feet hit the ground there would be compression taking place throughout the body, at the feet, knees, hips, low back, etc. Gravity causes compression of the body but so do the different landings of the jumps and the foot strike of running.

Box C is distraction, or a pulling apart. The eccentric phase (lengthening action) of muscle movement would be a distractive force. There are distractive forces with the plant in the pole vault and to a lesser degree using the arms to accentuate the take-off in the high jump. Box D is shearing forces. This is where forces are moving in opposite directions. The quick stop of a basketball player in order to pivot causes the femur to slide forward on the tibia. In the bench press the weight of the bar causes a shearing action at the shoulder joint because of the anatomy of the shoulder joint (it has a “flat” socket). While some sliding or shearing actions are normal, too much can cause serious injury.

Box E is bending forces. For our body model this could be flexing at the waist forward or extending backward. This would also include laterally bending to the right or left. It is important to note here that bending is a combination of two forces: one side of the body undergoes compression while the other side undergoes distraction. Once again, with proper elasticity and staying within one’s range of motion this is not a problem. Hyperflexion or hyperextension both can cause tissue damage on either the hyperflexed or hyperextended side or even both sides at once.
The final position is torque or twisting, represented by Box F. Torque is a twisting action which can be created in two ways. If two body segments are moving in opposite directions this would be called counter rotation. If one body segment remains stationary and a different body segment twists left or right (think of turning to look over your shoulder with your feet planted) torque is created at the joint. The classic examples here are the power positions of the throws. When the hips lead the shoulders there is body separation that activates a rotary stretch reflex and can increase performance. A second example is when the shoulder leads the throwing hand in the javelin. Still photographs of the javelin release can lead to dramatic illustrations of torque (Figure 2). In either case too much force on unprepared tissues can lead to injury.
The critical take-home point to all these boxes is that these are the only ways the body can move. For the coach or athlete to develop an intuitive appreciation of this fact will go a long way towards understanding how to prevent a host of commonly seen injuries in track and field.
FORCE—FREQUENCY—DURATION
A legitimate question to ask is why one athlete gets hurt running, jumping or throwing while another athlete, doing the same workout, workload, etc., thrives and actually improves with the work? At its core it boils down to how the athlete can handle force, frequency and duration. If there is too much force, too much frequency or too long a duration there will be a problem.

In Figure 3 are some common forces from track & field that the body must sustain. Too much force in any of the biomechanical directions discussed above can be the recipe for injury, whether that be an acute tissue failure (pulling a hamstring), sub-acute condition (Achilles tendinitis) or chronic tissue failure (herniated back disc or worn out knee cartilage).
“Too much frequency” can be thought of in two ways. If the athlete trains “hard” without adequate rest between training bouts, this could be an example of too much frequency. But frequency can also be used to describe how fast an action happens. If one “moves too fast” one loses coordination. Recall as a child the first time you ran down a steep hill. There was momentarily exhilaration with the speed that suddenly changed to terror as one could not move the legs fast enough to maintain balance and a fall resulted. Poorly coordinated actions with poorly conditioned muscles are a recipe for injury. If the foot pronates “too fast” this action can lead to excessive stress on the soft tissues of the foot and foreleg and result in shin splints, Achilles problems or plantar fasciitis from the weak, uncoordinated dynamic stabilizers of the foot, notably the posterior tibialis.
Duration is the final quality why some athletes get injured. If one trains for too long a time, once again without taking proper rest and recovery this can wear down the body. The daily and weekly demands of marathon training for the runner would be one example. Throwers can suffer from excessively heavy lifting programs that incessantly “beat up” the body from one workout to the next and may impact the length of one’s career, especially at an elite level due to a chronic tendinitis, cartilage wear or damage to the musculotendinous junctions.
ANATOMICAL ADAPTATION
The tissues that routinely become injured in track and field are: muscles, bones, joints, tendons, ligaments, musculotendinous junctions and fascial planes. Anatomical adaptation is the programmed use of exercises and conditioning methods to make these tissues “stronger” or more resilient to the stresses of running, jumping or throwing.
For the most part these tissues go unseen. While one can see muscular development, tendon or ligament strength is invisible. Anatomical adaptation has been called invisible training. Because of its invisible nature anatomical adaptation is often ignored. This is unfortunate because it is the functional integrity of these tissues that stabilizes joints, optimizes the stretch reflexes and combines to create a summation of forces that performance level sport demands. Anatomical adaptation also plays a significant role in career longevity. These tissues are best trained with isometric actions, non-movement actions which again, do not produce hypertrophy and visible results. This can present a challenge to our Hollywood, visually oriented culture.
THE CLOSED KINETIC CHAIN
A closed kinetic chain is a multi-link (joint) system in contact with the ground. In a closed kinetic chain one joint affects the next joint, and the next, and the next, etc. A simple experiment is to stand and place your finger tips on the point (ASIS) of the hips. Now slowly roll the foot to the instep and outside of the foot. You should feel movement at the hips. Movement of the foot (pronation and supination) affects actions at the knee, hip joint, sacro-iliac and lumbar spine. Excessive movement at the foot (too much force, frequency or duration) can negatively impact any of the joints or tissues within this closed kinetic chain.
Uncoordinated, asymmetric body movements place uneven stresses on the tissues of the leg and over time can present with injury. Proper technique, good posture, symmetrical body movements and overall body balance, in the true sense of that concept, become fundamental training goals.
TWO THEORIES—THE LINEAR MOVEMENT THEORY AND THE WEAK FOOT THEORY
The Linear Movement Theory states that as we age we become more linear in our actions. If you doubt this statement answer honestly the question, when was the last time you played “tag?” Track & field for the most part is a linear sport with “straight ahead” movement. We move straight ahead in all events except the hammer and discus. One can argue that there is the turn in track events and the curve in the high jump but there are no events where a “pivot” is part of the event such as commonly seen in ball sports.

Linear movements are essentially sagittal plane movements (Figure 4) that characterize most aerobic fitness activities. If the training maxim “the body adapts to the stresses placed upon it” is true the repetitive movements demanded by event techniques will develop muscles and tissues that help drive the body in the desired linear path. The problem that arises is that the dynamic stabilizers (at the ball and socket joints, low back, foot) begin to atrophy due to disuse, leading to decreased joint stability. An unstable joint has a “wobble” that translates into poorly mitigated forces (shearing, bending, compression, etc.) that can negatively affect immediate performance (a diluted stretch reflex, reduced force application or increased ground contact time) and over time result in an overuse injury.
While it could be argued that lateral motions are not “important” in track & field I would counter that the functional integrity of the dynamic stabilizers (whose role is to stabilize a joint complex) is critical for one to move with force, frequency and duration and to lessen the chance for injury.
The Weak Foot Theory states that Americans (and most Western Industrialized citizens) have weak feet. One of the characteristics of an industrialized nation is the proliferation of cement and hard level floors. Necessarily the foot must be protected from this unrelentingly hard surface. This is done with shoes. Shoes essentially represent a soft cast for the foot. But if one were to wear a similar structure on the hand for an extended length of time one’s manual dexterity would disappear.
The foot is the terminal point of the longest neural pathway in the body. This can be translated to “slowest” or the pathway that takes the longest time for a signal to be sent and received. Hard level floors present a consistent, unrelenting, challenge to the foot that in turn decreases one’s balance and proprioceptive sense. This presents a double whammy as all the events in track & field are performed on or with the feet. Couple that fact with the repetitive nature of running, the forces the feet sustain with weight training or the forces that must be mitigated with jumping and the incidence of foot and lower leg injuries becomes understandable, especially for the “untrained” or “weak” foot.
THE ARGUMENT FOR PRE-HAB EFFORTS
If track and field is mostly repetitive linear efforts with forces, frequencies and durations that commonly exceed the body’s ability to sustain these forces does it not make sense to spend time and effort on areas that commonly break down by bolstering the ability of these areas to withstand those forces? The solution here runs counter to the training maxim of “train movements, not muscles.” This exception to the rule can be justified because repetitive movements, by their very nature, are not “all-around” movements. The functional integrity of a joint complex requires “all around” movements. Pre-hab efforts then become of paramount importance, to insure this “all-around” development, especially in performance-based athletics (Figure 5).
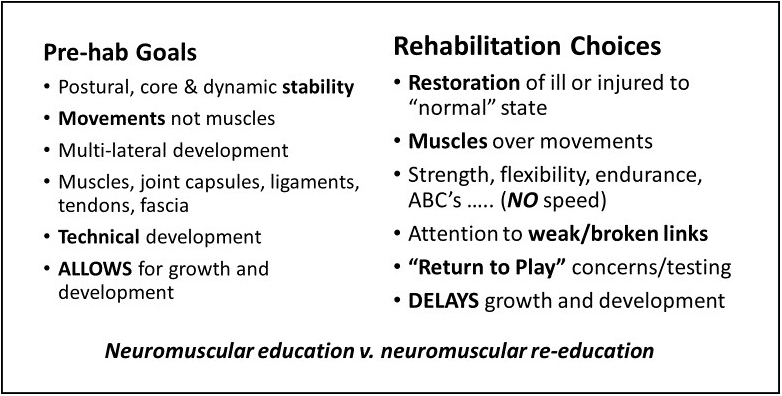
A second point to this argument is that failure to do pre-hab efforts often results in tissue breakdown. One must consider the time necessary for one to rehabilitate the injured area and return the athlete to “normal,” however that is defined. Note that during this rehab time period no development takes place. Necessarily alternate or reduced training loads will be used in an attempt to maintain fitness but new and improved levels of fitness are not achieved with these rehabilitative training workloads.
This becomes problematic when one considers that the “athletic life” of an athlete is limited. For the sake of argument, we’ll use 10-12 years of peak performance. A yearly one-month loss over this time leads to a loss of “time” over the career of 8%. That means that 8% of the athlete’s training time was spent not improving, up to one year’s worth of time. This directly precludes the athlete from achieving or maximizing his/her potential. To that end a well-designed pre-hab routine can eliminate or at least significantly decrease this loss of time and directly benefit a career.
The remainder of this article will take a joint complex by joint complex view of strategies that can be considered to bolster the body for the demands of the sport so that training and competition can be undertaken more aggressively and safely.
THE SHOULDER
To prevent injuries to the shoulder it is necessary to consider three situations regarding the shoulder: the function of the rotator cuff muscles, the habitual gathering actions required by modern life and how “poor” adaptive postures can accelerate shoulder problems.
The rotator cuff muscles are a group of four muscles that initiate all shoulder movements. The anatomical design of the shoulder socket, (the glenoid fossa) is similar to that of a pear (Figure 6). In a neutral, non-weight bearing position the humerus hangs in the lower portion of the fossa. When the arm moves in whatever direction the rotator cuff muscles contract. This contraction raises the head of the humerus into the narrower portion of the fossa and allows for a snug fit. At this point the larger muscles of the shoulder (pecs, lats, deltoids) can take over and accelerate the arm as necessary.

The supraspinatus lifts the arm to the side (abduction), the subscapularis internally rotates the arm and both the teres minor and infraspinatus are involved in external rotation. The supraspinatus has a poor mechanical advantage and is the most frequently injured. The subscapularis controls the circulation and nervous innervation around the shoulder (Murnaghan, 1988) and the arm. The external rotators are the weakest due in no small part to the fact that external rotation of the arm is not something one routinely does.
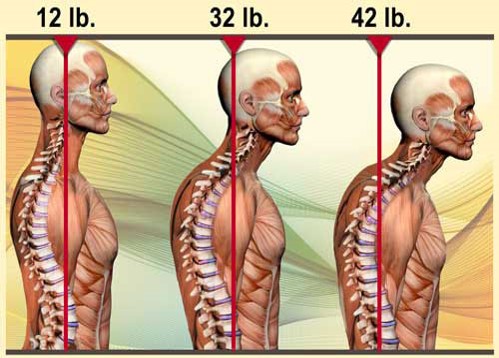
Much of arm and hand usage is due to gathering actions (bringing objects towards one’s chest). This habitual use leads to an excessive development of the subscapularis muscle which becomes short and tight. A common presentation of this is the person standing with backwards facing palms of the hand. This arm/hand posture constricts circulation to the arm and can create a negative cascade of events that includes the “proliferation of scar tissue” and accelerates wear and tear of the shoulder. Add to this fact that poor postures (forward head carriage, rounded shoulders, excessive cell phone use) further accelerate problems.
Proper shoulder posture dictates that the acromioclavicular joint (AC joint) should be below the ear (Figure 7). If the ear is ahead of the plumb line it is a condition called “forward head carriage” (FHC) which begins to stress tissues of the head, neck and shoulders (Figure 7). Modern society has promoted this posture from the student study posture, with daily computer use and the time a white-collar worker spends hovering over his/her desk work. Even the sleep posture of propping the head up with multiple pillows can promote FHC leading to neck and shoulder problems.
Most shoulder injuries seen in track & field athletes are not so much due to the demands of the events but rather ancillary activities like weight training. Lifters have a tendency to lift for the muscles they can “see.” This strategy leads to overdevelopment of the muscles on the anterior of the body to the neglect of the posterior musculature. This combination of poor postures and gathering actions can create joint and muscular dysfunction and eventually injury. Promoting shoulder stability, especially for weight training throwers becomes of paramount importance.
A simple but effective means to develop the shoulder musculature is to do the Talking Arms exercise (Figure 8). The exercise is performed by dribbling a medicine ball (recommended weight equal to competitive shot class) above the head with two hands as rapidly as possible (30-60 seconds, or 150x to start). This one exercise proves to be a great conditioner for the hands, wrist/forearm, shoulder girdle and also the serratus anterior muscle that stabilizes the scapula to the thorax. This exercise can easily be integrated into a training plan as a warm-up exercise, as a station in a circuit routine or as a stand-alone training unit with sets and reps. Olympic great Al Oerter stated that this exercise, more than any other lift, was the key to his success.

A second recommended exercise is to perform Side Lying Flys with a minimal weight (i.e., 1-5 pounds. Note: Using greater than 5 pounds can lead to muscle hypertrophy and may create a shoulder impingement problem). Figure 9 from The 7-Minute Rotator Cuff Solution (Horrigan,1993) demonstrates this simple exercise. Note that this exercise focuses on the external rotation rotator cuff muscles, the teres minor and infraspinatus. Other common lifting exercises (bench press, lat pulls, overhead presses) address the other three rotator cuff muscles.

THE LOW BACK
Low back pain is a plague for modern society. There are numerous reasons why the general public suffers from this condition. One of the things that characterizes industrialized societies is the fact that the majority of the populations spend their waking hours on hard level floors. There are three bones in the pelvis, two ilia and the sacrum. The ilia rotate around the sacrum with ambulation. Leg dominance, muscular development and the technical demands of different events (i.e., jumping off one leg) can cause the ilia to become uneven in relation to the sacrum.
This unevenness in turn causes an asymmetric gait pattern that is repeated 1000’s of times per day, day after day, week after week for a lifetime. This puts uneven stresses on the joints of the closed kinetic chain mentioned above. This in turn stresses the soft tissues that surround these joints. The challenge then becomes to fortify the individual links that help stabilize the low back.
In track & field both training and competition present assaults to the low back area. Olympic lifts and power lifting squats all produce significant forces on the lumbar spine as one goes through those actions. Long jumpers, pole vaulters and high jumpers all have a rapid hyperextension of the lumbar spine during the execution of their event. The 1000’s and 1000’s of steps a runner does over a season and career places a tremendous stress on the discs of the lumbar spine, particularly the L5-S1 disc.
Low back pain is actually a series of possible scenarios that include: a disc injury, facet problem, sprain of the sacroiliac joint, piriformis syndrome, muscular strain of the erector spinea muscles and quadratus lumborum and possibly stress fractures. Whatever the cause there are several preventive measures that can be taken that will fortify the area, especially for the rigors of the individual events of track & field.

Figure 10 is of the stabilizing muscles of the lumbar spine. Note the thickness of the muscles that form four “pillars” that stabilize the spine. Also note that they are essentially the same size (ideally). The psoas is about the size of one’s forearm. Most coaches are familiar with the anterior psoas muscles that are trained directly and indirectly with running actions, simple sit-ups or abdominal crunches. It bears repeating that these are anterior structures. The erector spinea are the posterior muscles that stabilize the spine. These are not readily visible, don’t have the “6-pack” appeal and are often out of mind. But for the lumbar spine to be stable all four of these muscles (2 psoas, 2 groups of erector spinea) need to be conditioned.
Core planks have come into vogue over the last decade and are a part of most people’s weekly training schedule. What is usually missing is any core work to the side of the trunk or for the back. Performance of core work around the body will help tone this stabilizing network of muscles. Figures 11 and 11a give suggestions on positions that challenge the whole body.
A question that has yet to be answered is how long to hold the plank position. Aaron Mattes taught that any isometric position (Mattes, 2012) held longer than 10 seconds creates an ischemic (lack of blood flow and oxygen) situation in the body. This causes a histologic change in the muscle tissue akin to scar tissue which has less elasticity and more easily damaged due to excessive forces.


There are fitness gurus who recommend planking for upwards of a minute or more. When one considers that sprinters are taking 4-5 strides per second, someone doing an Olympic clean and jerk completes the motion in less than 5 seconds and that there is no event in track and field that requires one to hold an isometric position continuously for over a minute, the wisdom of doing planks for 60 seconds or longer may be questionable.
Back hyperextensions and side lying lateral bends (use a “gentle” range of motion, don’t jam the back at an end range) both isolate the musculature of the low back (Figure 12). Use of these conditioning methods violates the “train movements not specific muscles” rule again but isolates and conditions this critical link in the body. This simple machine allows one to isolate that musculature that would otherwise be ignored. Abdominal work seems to fall in and out of favor but to do 20 sit-ups daily will keep those muscles toned without putting excessive stress on the low back discs.

A final pre-hab type exercise for the lumbar spine is the use of the pelvic tilt. As illustrated in Figure 13 the athlete lies on the back and simply presses the lumbar spine to the ground. This is done in a slow and rhythmic manner with an emphasis on control. This is true neuromuscular education of the musculo-skeletal system of the lumbar spine. One of the reasons the general public suffers such frequent episodes of low back pain is that they have lost the “sense” of this area of the body and engage in activities (raking leaves, snow shoveling, vacuuming the floor) until they have strained these relatively insensitive structures. Periodic use of pelvic tilts will restore this sense.

THE HIPS
In the shoulder the rotator cuff muscles were discussed at length. In the hip there are a group of analogous muscles (piriformis, obturator internus and externus, quadratus femoris, gemellus superior and inferior) that play a similar role in the stability of the hip joint and that play a critical role in one’s ability to run, jump, squat, bend forward and to stabilize the femero-acetabular joint (hip joint) in the isometric positions of dynamic stability needed for single-leg support.
“Weak hips” (admittedly a lay person’s term) are responsible for not only hip pain but also knee and low back pain. Once again, the coordinated functioning of the closed kinetic chain is critical for the safe participation of the athlete. Figure 14 illustrates a fit young female performing a drop jump and clearly illustrates “valgus collapse” of the knees, the result of weak hips. This is an ACL injury waiting to happen.

Dynamic stability at the hip is created by the gluteus medius, the psoas and the adductor magnus. These three muscles together stabilize the multi-axial ball-and-socket hip joint as one stands in single support. The functional integrity of these muscles prevents a Trendelenburg or “Stress Trendelenburg” Sign (Figure 15). Ben Johnson showed this sign in spite of having a 42” vertical leap, 600-pound squat and the ability to run the 100m in 9.79 seconds. This was an area that Charlie Francis felt was “unimportant” because sprinting is a linear action and was not subsequently trained (Francis, 1988). When performing a straight leg rise (aka hamstring stretch) to 90 degrees, if the athlete complains of “tight hamstrings,” the hamstrings feel tight to the athlete because his body is trying to stabilize the hip joint with the hamstring muscles that do not have the proper mechanical advantage to stabilize the hip joint. Their dynamic stabilizers are weak, poorly conditioned and not doing their job.


There are three exercises that can strengthen the muscles surrounding the hip. The first is a leg-over drill commonly used by hurdlers. Set the hurdle height about “groin height” and from the side of the hurdle bring the leg up and over (Figure 16). This can be repeated up to 10-20 times. The second exercise involves using elastic bands at the knees. These bands are about two inches wide and should be placed just above the knee joint. The exercise is to step sideways, slowly for 25 meters. This can be repeated a few times.

The final hip exercise is a total hip machine (or some variation thereof). This machine allows one to focus on strengthening the hamstring as a hip extensor along with strengthening the adductor magnus and gluteus medius. When sweeping the leg to the side in either abduction (leg away from midline) or adduction (leg towards midline) both the gluteus medius and adductor magnus receive specific attention respectively. Toning of adductor magnus (Figure 17) will go a long way toward preventing hamstring strains as a strong, healthy adductor magnus acts as a fourth hamstring and helps to powerfully extend the hip. Use of a hamstring curl machine is more a bodybuilding exercise. This machine trains the hamstring as a knee flexor, not hip extensor which is the running and sprinting action.
THE KNEE
The knee is certainly a problem area for runners. The constant pounding of training can wreak havoc on this joint over the course of time. The odd thing is that knee injuries are often the consequence of problems somewhere else in the closed kinetic chain. We established that “weak” hips can create instability here with “valgus collapse” but also iliotibial band problems or patellar tracking problems. But if the foot is not properly conditioned for the stresses of running, jumping and weight training on this unstable foundation can contribute to problems at the knee.
One thing that helps alleviate knee problems is to make sure that the quadriceps muscle is strong. As was established most of the efforts in track & field are linear motions moving forward. This tends to develop or overdevelop the musculature on the posterior of the body. Something as simple as leg extensions done 1-2 times per week will tone this muscle group enough to prevent a host of potential problems.
Other exercises that can effectively condition the quadriceps are wall sits—sitting with the back against a wall with the hips and knees flexed to 90 degrees. Once again, the time of this exercise seems to be in question. A compromise of 30 seconds a few times a week would be worthwhile. Squatting either with weights or without weight will also develop the quads. Squats should be performed in a slow and rhythmic action. There should be no “valgus collapse” as noted above and the patella (knee cap) should not travel ahead of the great toe.
Squatting until the thighs are parallel to the ground is recommended, going deeper into a full squat is counterproductive. Introduction of weights should be a gradual process. If working with novice athletes honing the squat pattern with literally hundreds of squats over the course of several years is a safe way to promote good knee and leg heath. Bompa recommended at least three years until an athlete could do moderate to heavy plyometrics which would translate to a similar ramp up time until one gets to squatting 2x body weight (Bompa, 1993).
Patellar tendinitis is an endemic problem for high jumpers. On a healthy leg the use of eccentric lifts in the preseason or early conditioning phases of the seasonal cycle will help mitigate the forces of the single-leg take-off. On a leg extension machine both legs can contract bringing the weight to ground parallel with one leg lowering it (an eccentric contraction). Remember that eccentric efforts are neurologically fatiguing (Siff, 2004) so this type of training should be used judiciously with more rest in the subsequent days.
For more mature, sophisticated athletes squats can be done where the athlete squats with a heavy load and teammates remove a plate from each side of the bar before the athlete returns to the standing starting position. The plates are put back on the bar and the eccentric portion of the squat is performed again. Understand that to try either of these types of lifts on an already injured leg will prolong the problem.
FORELEG—SHIN, ANKLE, HEEL AND FOOT
As mentioned, if one were to wear an apparatus on the hands similar to a shoe the ability of the hands to execute fine motor skills such as threading a needle, combing one’s hair or simply writing would soon become next to impossible. The muscles of the hand that execute these fine movements would atrophy and we would lose the ability to do those skills.
Also as mentioned previously, one of the things that characterizes industrialized nations is the proliferation of cement. Cement and hard level surfaces (hard level floors) present a continual assault on the foot. So what do we do? Shoes are made for protection. But unfortunately, shoes have also become a potential “fashion statement” that can lead to questionable decisions. High heels, narrow toe boxes, poor heel counters and the absence of any arch support can individually or in combination present foot problems for most people.
Add to this fact that most people’s “typical” linear movement patterns and the development of foot issues are a logical progression. Steps must be taken to strengthen the foot creating a more stable foundation for the body. This has far reaching consequences that include better balance, force production and decreased ground contact times at the foot while also decreasing the possibility of problems further up the closed kinetic chain.
Oddly “strengthening” the foot is not on the radar screen of ANY of the fitness gurus in their quest for the perfect Hollywood body. If you check any of the bodybuilding magazines, books or DVD’s produced you will not find anything that deals with strengthening the foot. Yet virtually all sports are conducted on the feet.
The length of this longest neuromuscular pathway in the body also plays an important role in one’s balance. A poorly refined pathway allows for a “slower” signal that may have implications in the severity of an ankle sprain one suffers. This certainly is a factor for the 65+ population and can contribute to the severity of falls this age-group suffers.
One way to develop foot strength is with the six-foot drills (The 6 Foot Drills on YouTube). This simple series of foot drills works all the muscles of the foreleg and helps to develop one’s balance and proprioceptive sense of the lower leg (Figure 18). Interestingly the muscles involved in the inversion, eversion, toeing in and toeing out, forefoot walking and heel walking (always with the shoes on) challenge all the different neural pathways coming from the low back. Repeated daily for 25m the foot drills will tone these muscles and develop the various pathways so that the foot has a “margin of error” with regards to injury development. The foot becomes better able to withstand the forces of ground contact seen with all running, jumping or throwing activities.

A second preventive step for the foot is to wear a plastic heel cup. This would be a recommendation for all jumpers, hurdlers and steeplechasers. At the bottom of the heel bone is what is called the calcaneal fat pad (Figure 19). This is tissue that cushions the foot and absorbs the shock of heel contact. The problem develops that over the course of a career the fat pad can break down, offering less protection.

A common injury here is a stone bruise to the bottom of the calcaneus. In either case a hard-plastic heel cup (Figure 20) helps keep the fat pad more tightly bunched and makes its shock absorbing qualities more effective. Note the recommendation is for a hard-plastic cup. While one might think that this is uncomfortable it is not the case. There are soft, highly flexible models on the market but they effectively raise the heel potentially allowing for rearfoot instability. To prevent heel blistering it is recommended to routinely trim the back off the heel cup (Figure 20 – black line).

The final point in the foot area is to develop a better sense of balance. Balance is the most important biomotor skill and probably the least trained. Virtually everyone takes their balance sense for granted. Whether this is through ignorance (don’t understand its importance) or denial (loss of balance is a precursor to death) the fact is that for most balance is poor and for many it can be simply, quickly and significantly improved. One study on college-aged students achieved over a 200% improvement in six-weeks (Balogun, 1992). That is like taking a 10’ long jumper and having him jump 30’!
A balance board is easy to make and probably could be built from scrap wood in one’s cellar. The dimensions are 16” x 12” with a 2×2” square center piece. (Figure 21). The 2” centerpiece will allow for a 22-degree tilt to the board which is the range of motion of a normal ankle joint. If the boards are built to the 16×12 dimensions one can make 24 from a standard 4×8’ sheet of plywood. There are higher tech circular boards on the market but I have always questioned the need for a more sophisticated and expensive model when most will be challenged to master the simple 16×12 model.

POST-WORKOUT SUGGESTIONS
The use of a foam roller is a simple and effective means to self-massage various muscles in the body. It is recommended this be done after practice for up to 10 minutes. The age-old practice of yoga has recently come into widespread use. The problem is that for many people it is simply another undirected form of stretching. Richard Hittleman’s (1969) book 28 Day Guide to Yoga is an excellent step-by-step progressive plan that stresses proper technique, posture combinations and breathing techniques that are consistent with a programmed approach. Each “day” takes approximately 20 minutes and over the course of a month one develops a heightened sense of body awareness and becomes well versed in how to attend to problem areas in the body.
IMPLEMENTATION
Improvement necessitates change. There are many suggestions here. No doubt most reading this article already have a “pattern” used for daily practice. Regardless of your current pattern virtually all these suggestions can be fit into 8-minutes of practice time. The foot drills take three minutes. Balance board work can be done in one minute. Use of the elastic bands can be done in two minutes. Medicine ball work can be done in about 90 seconds. Yoga and specific lifting exercises can be done at the end of practice and may take 15-20 minutes of the warm-down.
Cost is always a factor. All the recommendations could be done for about $250 and that is with the back extension equipment costing about $200. The planks and foot drills are free. The heel cups cost about $2 each. The 24 balance boards can be made for about $36 of plywood. The elastic bands are about $1 each. A good, unbreakable medicine ball runs about $25-30 dollars each and Hittleman’s yoga book is about $7.
When to fit these drills and exercises into practice plan? See the suggested pattern for the daily practice plan (Figure 22). There is much flexibility here so feel free to tailor it to your specific needs or problem areas. Movement patterns are recommended in the warm-up portions of practice. During warm-down work to normalize function. For the other suggestions consider implementing them into circuit routines. This allows creativity and change throughout the daily week.

CONCLUSIONS AND FINAL RECOMMENDATIONS
There are different philosophies on what role injuries and the risk of injury plays in performance development. No pain, no gain and no risk, no reward are sentiments many coaches express at one time or another. I always took it personal when one of my athletes got injured. I tried to find out what I had done “wrong” and what could have been done to prevent the injury from happening.
There also must be some level of personal responsibility on the part of the athlete for his/her own welfare. If you are dealing with 10-year-old Junior Olympians getting them to wear a coat in the winter may be the big challenge. The transition into early adolescence presents its own challenges. The growth and development of late adolescence also presents a different set of aches and pains for these athletes that may or may not be related to training.
The ability to keep the mature athlete injury free cannot be underscored enough. If their athletic “lifespan” is only 10-12 years then any down time due to injuries is lost time. This time will never be regained and will limit one reaching full potential. Individuals must take responsibility, self-leadership for their own care, in terms of sleep, hydration and all the other factors and distractors that make up everyday life and become the challenge of “good decisions.”
Finally, it is important that the team internally promote a mindset where they, as a group, refuse to get injured. This will lead to internal promotion of the team’s values with teammates encouraging each other to do the foot drills, stretch, do a proper warm-down, etc. essentially promoting healthy habits and responsibility to the team. There is certainly a degree of luck involved as far as injuries go but just as luck favors the prepared mind, luck also favors the prepared body.
REFERENCES
Balogun, J.A., Adesinasi, C.O., Marzou, D.F. (1992). Effects of wobble board exercise training program on static balance performance and strength of lower extremity muscles. Physiotherapy Canada. 44:4.
Bompa, T.O. (1993). Periodization of Strength. Veritas Publishing: Toronto: Ontario, CA. pp. 184-192.
Francis, C., Patterson, P. (1992). The Charlie Francis Training System. TBLI Publications: Ottawa, CA.
Hittleman, R. (1969). Richard Hittleman’s 28 Day Guide to Yoga. Bantam Books: New York.
Horrigan, J., Robinson, J. (1990). The 7-Minute Rotator Cuff Solution. Health for Life: California.
Mattes, A. (2012). Active Isolated Stretching. Stretching USA.
Murnaghan, J.P. (1988). Adhesive capsulitis of the shoulder: current concepts and treatment. Orthopedics. 11(1):153-158.
Siff, M.C. (2004). Supertraining. Supertraining Institute: Denver, CO. p. 51.
www.youtube.com. The 6 Foot Drills, FLPKtv. 2:55.
RESOURCES
Heel cups and elastic bands – MF Athletic, Cranston, RI. www.everythingtrackandfield.com 888-556-7464
